The Easy Setup Guide for RTL-SDR Trunking with One USB Dongle

After researching the RTL-SDR software defined radio, we’ve determined the easiest way to setup the device on a Windows computer. There are multiple versions of the USB SDR, but this is the straightforward way to get the device working for digital trunking systems. It’s possible to turn a $20 device into a VHF/UHF scanner by following these simplified steps. Note: These instructions do not include steps to decode encrypted radio communications.
RTL-SDR
RTL-SDR is an example of how hacking and tinkering can lead to something positive. The device is a small USB dongle that has been modified from a DVB-T TV tuner to a software defined radio. It was discovered that the modification typically allowed moderate reception of frequencies between 50 MHz to 1.7 GHz. Reception isn’t anywhere near as good as a dedicated receiver/scanner with proper filters and circuitry. However, it’s now possible to turn the device into a VHF/UHF trunking radio scanner by following some simple steps. The RTL-SDR is available from multiple sources for around $20.
Before we continue, there are also many questions about shortwave receive. Even with a required upconverter, the RTL-SDR receive on HF (below 50 MHz) is very weak to deaf. Unless it is demonstrated that a newer version or modification produces significantly better results, buyers can assume that it’s not a very good shortwave receiver.
Using RTL-SDR for Trunking Radio Systems
It’s possible to use the RTL-SDR to track trunked radio systems, particularly in the UHF band, especially 800 MHz. It will properly trunk EDACS and Motorola systems that are not encrypted. Other systems can also be tracked. It’s best to use two USB RTL-SDR dongles, but you can start listening to trunked radio with only one. This is a simplified guide of how to use one dongle to trunk digital radio systems in the UHF band.
Required Software
In order for the RTL-SDR to work, you must follow these steps in order. The device requires special drivers and software that must be configured in order for this to work. You can expect about 15 minutes to half an hour to get up and running. You must have an antenna (the RTL-SDR usually comes with one) in order for this to work. In addition, this guide is for a Windows system only. Linux based systems may differ in setup. Setup typically requires administrator privileges.
These steps are specifically for getting digital unencrypted trunking to work using the RTL-SDR device on a Windows 7/8 64 bit machine only. Be patient because this process isn’t user friendly (because it’s not automatic) and requires specific software and exact configuration.
Step 1
Plug your RTL-SDR USB dongle into your computer. Ignore any information about drivers failing to install.
Step 2
Download the RTL-SDR driver install software here.
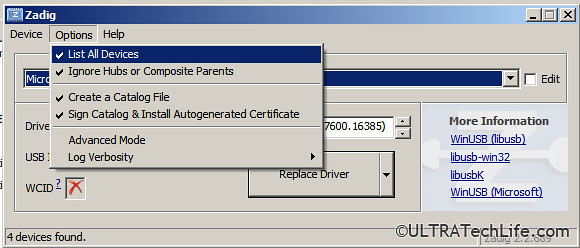
With your RTL-SDR device connected to your computer’s USB port you will launch the software “zadig.exe” and select “list all devices” under options. You must select “bulk interface 0” as your device. The driver should be listed as WinUSB (6.xxxx).
Click on “install” or “reinstall” driver. It make take several seconds, be patient.
You cannot continue the process without successfully installing the drivers.
The software will tell you if/when the drivers successfully install. If you successfully install the driver, then close the driver installation software and go on to the next step.
Step 3
Download the latest version of Unitrunker. Install it to your computer.
Run Unitrunker and select the plus sign to add a new receiver. Note: for the remainder of steps your RTL-SDR device must be plugged in and the drivers must be properly installed!
Select “RTL-SDR” as your device. You should now be able to double-click it and see many settings/options for “VCO” and “info.”
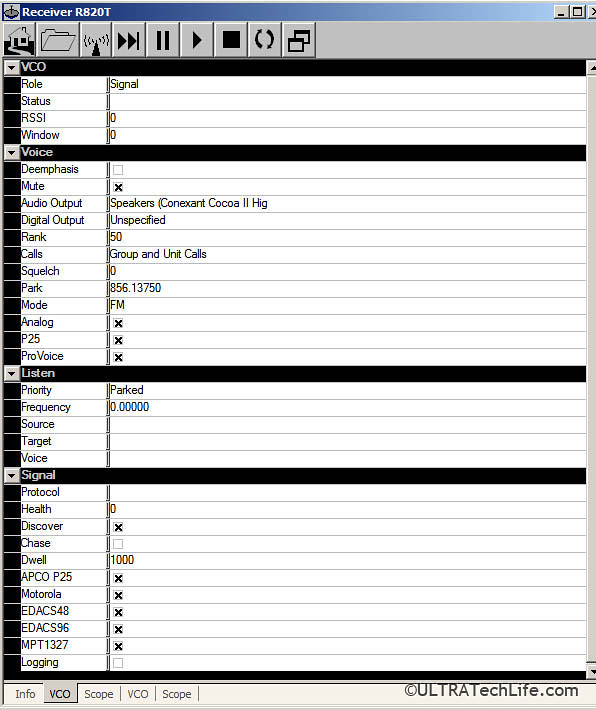
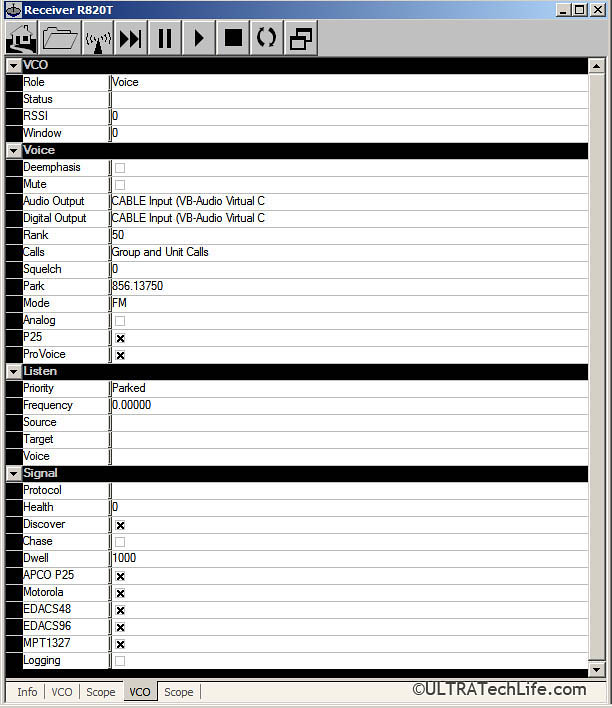
Next, copy the configuration settings in the image below. You should have 2 VCO’s set under the “info” tab. The settings should match what you see in the images EXACTLY.
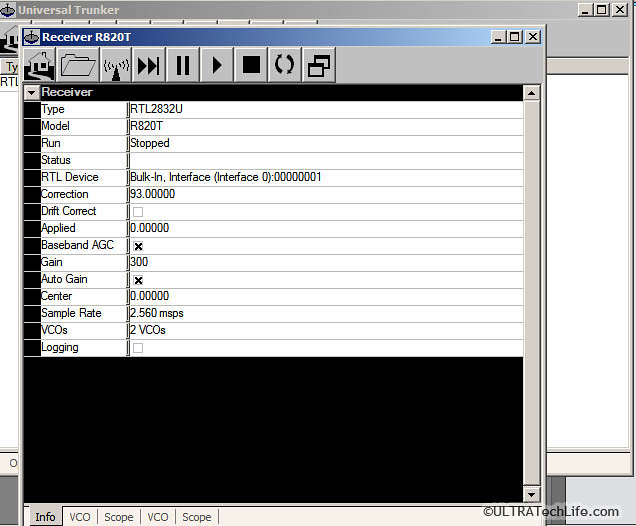
Once you’ve configured it, click the play button, which will start Unitrunker in running mode. The status should switch to “running.”
If you’ve properly setup Unitrunker, you will likely see another window pop up after a few seconds of listening to the control channel. You will see talk groups, which means your software is properly working. In order to decode the digital audio, you must go onto the next step of setting up DSD+.
Step 4
Download DSD+. This is the digital voice decoder software. Install DSD+ by unzipping it to a folder. Remember the folder’s location! Be sure to use the latest version.
You must also download lame_enc.dll, which is a required driver. Download lame_enc.dll and put it into your DSD+ directory.
You have now completed setup for DSD+. Close all DSD+ windows before continuing.
Step 5
You must have an audio piping program to route the digital signal to DSD+. ULTRATechLife recommends VB cable. Download/install it and do not change any of its settings.

You will also need to go to your audio control panel and click on recording devices. Set the VB cable device to be the default recording device.
Step 6
After you correctly setup DSD+ and VB cable, launch Unitrunker. Wait a few seconds for talk groups to appear. You should now see a scrolling list of talk group ID’s.
Next, launch DSD+ to start decoding voice. Launching DSD+ involves going to the directory you installed it in and clicking on DSD+.exe (or DSDplus.exe) to start the program. You should see several windows pop up and you should leave them running for DSD+ to work.
You can start/stop Unitrunker by pressing the Play/Stop buttons.
Critical note: The RTL-SDR device requires some tinkering with the “Correction” setting/field in the “info” settings tab of Unitrunker. We recommend letting the RTL-SDR heat up for 15 minutes and setting the “Correction” value… between: 90.0 – 99.0 (until you hear clearer trunking voice reception). Change this value, until you get it working!
If you hear voice from the trunking system, you’ve successfully setup your RTL-SDR device, congratulations. If this didn’t work for you, you should start from step one. Be sure you follow the steps exactly.
Conclusion
Setting up RTL-SDR requires special software and configuration, which makes it a moderately difficult thing to do. It’s not user friendly and is definitely not something that’s so easy anyone can do it. However, it’s an interesting thing to play with and you can search Google for other ideas on how to use the RTL-SDR device.
It’s also possible to use special software, such as SDR Sharp to manually tune in other frequencies, listen to aircraft, weather band, FM radio, and other amateur radio frequencies in the VHF/UHF bands. Finally, most people will find that only stronger signals can be received with the RTL-SDR. It’s not that great of a receiver, but it does work.
Good luck with your listening and tinkering! We hope you found this article helpful.
More about author.